Is your brand new I2C OLED display not working? Don’t worry. Previously, we studied the interfacing of an OLED display with NodeMCU in the post mentioned here. Now, sometimes it may happen that due to some basic errors, the display may not work. Here, in this guide, I will describe the maximum possible issues that can lead to the failure of OLED Display. If you have bought a display like this, then the following tutorial will help you.
Why my OLED Display is not working?
You bought an OLED display, made connections, uploaded a demo code, BUT the display did not light up! You did try a lot of different things but no luck? Then you are in right place. Whether you interface OLED with Arduino, NodeMCU, or any other board, there are some common checks you should do before thinking your OLED is dead.
Possible reasons behind non-working OLED display
Pin Connection of OLED Display
Check the proper pin-out. If you have the wrong connections, then the display will not even start! So following is a pin connection for some popular development boards.
| OLED Display Pins | Node MCU Pins | Arduino UNO Pins | Arduino Nano Pins |
| SCL | D1 | A5 | A5 |
| SDA | D2 | A4 | A4 |
| VCC | 3V | 3.3V/5 V | 3.3V/5 V |
| GND | GND | GND | GND |
Type of OLED display
As mentioned in the previous post, I2C OLED comes with different variants. In one of the variants, it comes with a reset pin and another one is without a reset pin.
Code statement for displays without Reset pin:
#define OLED_RESET -1 Code statement for displays with Reset pin:
#define OLED_RESET 4 //if reset pin is connected to pin 4Address of your I2C OLED display
Most of the time, the address may be the main cause of the failure of your OLED display. Before programming, make sure the address of your I2C display is proper. Here, address I2C address is different for different resolutions of the display. Following are the two addresses for the OLED displays currently available in the market.
#define OLED_ADDR 0x3C // here address is 0x3C for 128x32 display#define OLED_ADDR 0x3D // here address is 0x3D for 128x64 displayIf both of the above addresses won’t work, you should try using the I2C device scanner program. It will find the address of the connected peripheral.
Resolution of your display
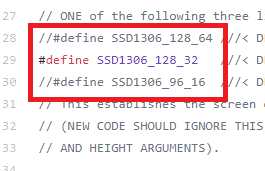
Resolution is also defined in the library of the OLED display. Depending on the resolution of the OLED display, you may need to make necessary changes in the program. The following code snippet shows the block where we declare size and executes the command for OLED display.
#define SCREEN_WIDTH 128 // OLED display width, in pixels
#define SCREEN_HEIGHT 64 // OLED display height, in pixels

#define OLED_RESET -1 // Reset pin # (or -1 if sharing Arduino reset pin)
Adafruit_SSD1306 display(SCREEN_WIDTH, SCREEN_HEIGHT, &Wire, OLED_RESET);
In the library file, you need to change the header file. To make necessary changes, follow the steps below:
- Open “My Computer” > Documents > Arduino > libraries > Adafruit_SSD1306.
- From the library folder, open Adafruit_SSD1306.h file.
- You need to uncomment the statement which defines the resolution of your display and comment all other statements.
- Open “My Computer” > Documents > Arduino > libraries > Adafruit_SSD1306.
- From the library folder, open Adafruit_SSD1306.h file.
- You need to uncomment the statement which defines the resolution of your display and comment all other statements.

Power source of your OLED Display
If you are powering your OLED display by an onboard power source and the board itself powered by Computer/Laptop USB, then try powering it with the external power source. OLED display needs input voltage around 3.7v to 6v. Here, 5v will be the ideal source.
Check program for display.display() command
For programming of OLED display, display.display() is a necessary command in order to display the contents. This statement should be executed every time whenever changes are made in the display contents. Check for the missing command, if your display is not getting updated.
Inspect your code for invalid display instructions
Still, is your I2C OLED display is not working even after trying the above solutions? Then there are high possibilities that your program has some invalid instructions for OLED display. So better you recheck your program.
If you find any other problem or solution regarding the OLED display, do comment and share your contribution in this article.


Really helped a lot. Saved my day.
Thank you
I had searched for many solutions but this worked instantly. Thanks
Thank you
You are master! My OLED was not work. On the label of my OLED is: “128×64” but after using I2C scanner I got adress 0x3C. It means I have 128×32! The supplier made a mistake. Now works perfectly. Thank you! But on my Arduino Nano works with pin A4-SDA and A5-SCI.
Glad to know it! I spotted my mistake for Arduino Nano, and updated it!
Hey – I found the same address (0x3C) but when I use the 128×64 test code (and change the address in the test code) it works at the higher resolution. You might find your display just has the wrong address, and is still 128×64.
Hey – I found the same address (0x3C) but when I use the 128×64 test code (and change the address in the test code) it works at the higher resolution. You might find your display just has the wrong address, and is still 128×64.
My display is 128×64, but its address must be 0x3C, 0x3D isn’t working. I almost gave up, this was the last solution and now it works perfectly.
Thank you so much! I had the same problem as Diego, I received a display that was mislabeled as 128×64 when it was acutally 128×32.
Also, just FYI for anyone else having trouble with their I2C Displays: At least on my computer, the USB ports weren’t powerful enough to supply both the ESP8266 and the display with enough current. When I connected it to an external power source, it worked flawless.
Thanks for one more solution. I will definitely add this one!
display.display() did the trick. Feel like a complete idiot... Thanks a lot!thank you so much
hello,
I have a problem, it seems that the screen only works on a little part in the top. I have look on the internet to find an answer but i do not find anything. Could you help me please ? For exemple, i will just write “hello” on the screen but it didn’t work.
Thank you
There are some strips of lines across the 128*32 OLED screen, don’t know whether it is damaged or not. I use
code. Any help?
I have the same problem of Merlin but not solution after many changes and test
Merlin the problem is the driver.
Instal SH110X Adafruit librairie and run Adafruit SH110X
select
OLED_QTPY_SWH1106
select
SH1106_128X64_I2C
You helped me a lot, Sir!
Thank you!
Use 128*64
My problem: uploading the stock example script didnt work, even after follow many suggestions online. The screen was just black. I turned on the serial monitor and could see something was happening. I struggled with this for a while before remembering I already had an old script that worked. Its just a stripped down version of the example script. (no comments or anything extra) and it worked first try! *One thing I did just now notice is that the baud rate is different for the serial.begin command. This uses 115200, example script uses 9600. But that shouldn’t/wouldn’t affect the screen… Read more »
Hello,
I bought such displays on Aliexpress (I2C SSD1306 12864 LCD Screen Board 1.3 Inch). Two thirds of the display is full of dots and only one third of the display works, if I use the 0.96 inch display it works well. This is an example program from the Arduino IDE.
The motherboard is UNO R3.
Please help me because I’ve tried everything.
Hi. Unándi
my oled work in samples but not on my sketch