
Previously, we have studied to interface fingerprint scanner with NodeMCU. We have also studied that, we can interface I2C OLED display with NodeMCU with less GPIO pins. Today, we will combine those both tutorials to build IoT based home security with fingerprint authentication. Let’s start with project requirements.
Component List:
Now, the above component list gives an idea about the main and must have the necessary components for IoT based home security with fingerprint authentication. Some basic components like connecting wire are assumed to be had with you. Now, before starting with the construction, I will clear one thing that, we can use other fingerprint scanners like R307. For this project purpose, I am using GT511C3. The fingerprint scanner GT511C3 has more advantages over R307.
Requirement Analysis
Now, before going for construction, let’s do some analysis of the project. As the title suggests, this project is IoT based. It means we will send security alerts and logs to the user. This home security will be provided with the help of a fingerprint scanner. We will be using OLED display for the interaction between the client (whoever applying finger for authentication) and device.
Here, as its a security device, we must take care of some things. The latch we are going to use to lock the door must be inside and well protected. The main controller must be inside and well isolated from external malfunctioning attempts. Here we must take care of the fingerprints stored in the module. For safety reasons, we should not include the code of fingerprint enrollment in the main program. This will protect the device from unauthorized fingerprint load attempts in case of poor programming. Here, in this project, for demonstration, we will use Servo motor as a latch for the door.
Interfacing of OLED Display and Fingerprint scanner with NodeMCU
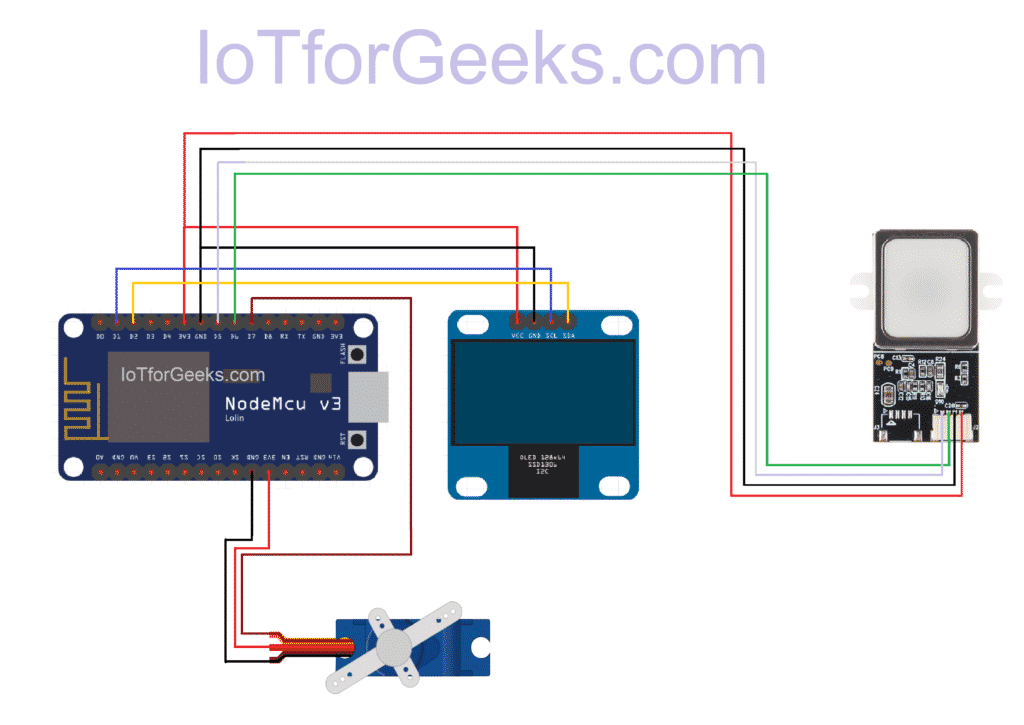
Let’s begin with the project IoT based home security with fingerprint authentication with the interfacing of the I2C OLED display and fingerprint scanner with NodeMCU. As we know, the I2C OLED display requires an I2C port. For NodeMCU, I2C port is at pin D2 and D3. The interfacing of the OLED display is explained in detail in this post.
Now we have to interface servo motor with the NodeMCU. As we know, the servo motor will need the PWM signal. Here, for NodeMCU, we will use pin D8 for the data pin of the servo motor. The below image shows the interfacing of all components for IoT based home security with fingerprint authentication.
Programming our Home security device
Firstly, we have to store the authenticated fingerprints in the fingerprint scanner. For that, please use the code to enroll the fingerprints. You can find that code here.
After successful enrollment of your fingerprints, you can use this program for the interfacing of OLED Display with NodeMCU. The program to interface Servo motor with NodeMCU is as given below:
Program to interface Servo Motor with NodeMCU
#include <Servo.h>
Servo servo;

//For more details about hardware connection, do visit https://iotforgeeks.com

void setup() {
	servo.attach(D8);
	servo.write(0);
	delay(2000);
}

void loop() {
	servo.write(90);
	delay(1000);
	servo.write(0);
	delay(1000);
}
Note that the above program is only for the interfacing of Servo motor. For building the project you need to code for the fingerprint scanner and OLED Display as well. The links for the code are mentioned above. You just have completed project IoT based home security with fingerprint authentication.