
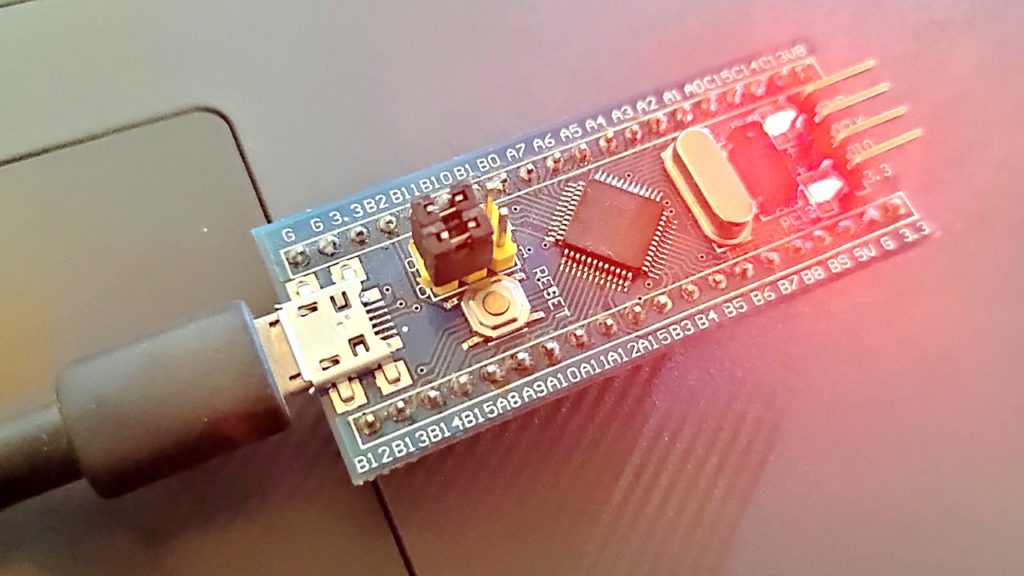
Arduino is the most used and preferred micro-controller board since its development. Nowadays, there are some alternatives for Arduino as well. Blue Pill STM32 (STM32F103C8) is one of them. STM32F103C8 microcontroller is based on ARM cortex M3 architecture. Which makes it more efficient than Arduino. To program Blue Pill STM32, we have two options, we can program it through an external programmer or directly by onboard micro USB port.
Introduction to STM32F103C8
STM32F103C8 (Blue Pill) has a higher number of pins as compared to Arduino Nano and Arduino UNO. Also, it has 16 bit ADC while Arduino has a 10 bit ADC. There are some more noticeable differences where Blue Pill leads the Arduino. Hence Blue Pill is also considered as an alternative to Arduino.
As we mentioned earlier, there are two ways of programming Blue Pill. Programming a Blue pill through an external programmer is a very hectic task. Also, we need a serial programmer all the time when we have to program the Blue Pill. Unfortunately, the STM32F103C8 development board doesn’t come with an inbuilt Arduino bootloader. So, we can not program a new STM32F103C8 development board through Arduino IDE.
To program Blue Pill STM32 directly from USB, we will flash Arduino Bootloader in it. Fortunately, there exists an experimental bootloader by LeafLabs developed for MapleMini boards. We can use this experimental bootloader to program Blue Pill STM32 with Arduino IDE. So let’s get started!
Materials Required
Before starting with steps to program Blue Pill STM32, I will enlist the material required. We will need the materials mentioned below:
- STM32F103C8 Development Board (STM32)
- FTDI Programmer
- MicroUSB to USB cable
- Breadboard
- Connecting Wires
- Laptop/PC with Internet
Circuit Diagram
We will require an FTDI programmer to flash Maple Bootloader into STM32F103C8 Development Board. After flashing this bootloader, we can program the STM32 Blue Pill board directly through the USB port. No need for hectic circuitry every time! The circuit for FTDI and Blue Pill is as shown below:
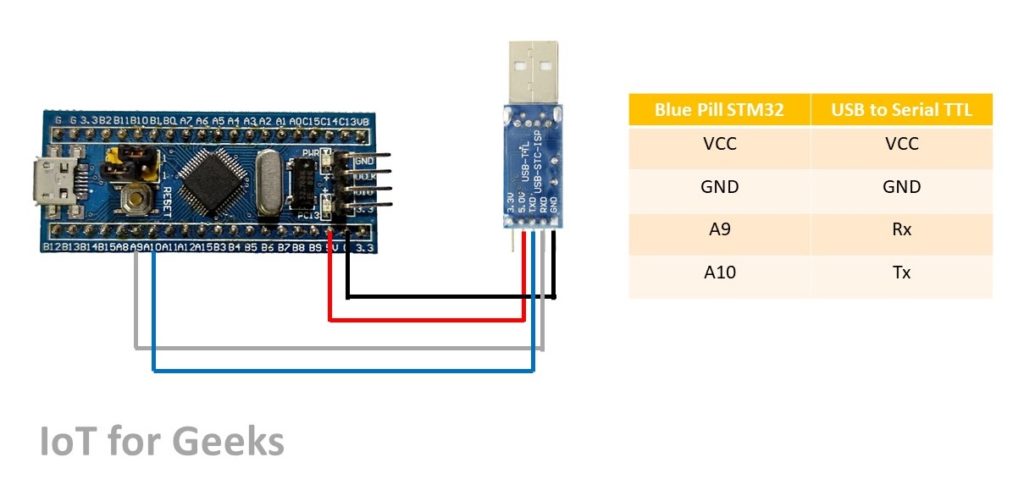
The pin connection Table is as below:
| STM32 Blue Pill Pin | FTDI Programmer Pin |
| 5V | 5V |
| GND | GND |
| A9 | Rx |
| A10 | Tx |
Now, before proceeding to flash Maple bootloader in Bluepill STM32, make sure to enable the program mode of Blue Pill. We can change the mode of the Blue Pill by changing the place of Jumper 1. The image below illustrates how to change the mode in Blue Pill STM32.
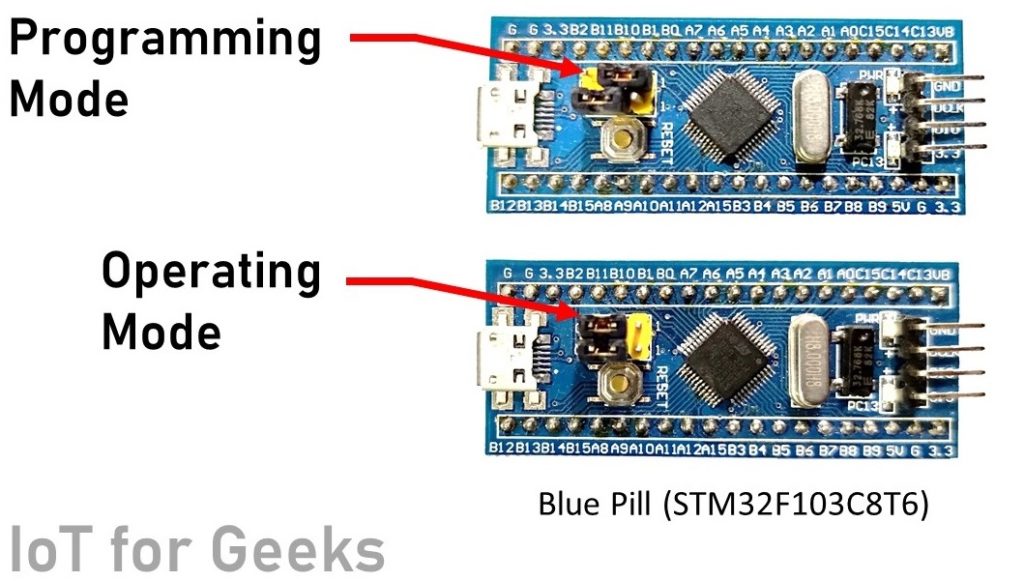
Now after changing the mode of the STM32F103C8 development board, we are ready to flash maple bootloader in it.
Steps to flash Maple Bootloader in Blue Pill STM32 microcontroller
After completing the above connection, we will flash maple bootloader in the STM32 Blue Pill microcontroller. After flashing this we will continue to install the STM32 board in Arduino IDE Boards Manager.
Implementation Time 30 minutes
Step 1: Download Essentials

Before proceeding to flash the bootloader, we have to download some essential file and software as mentioned below:
1. Maple bootloader for STM32 Blue Pill Microcontroller
2. STM Flash loader software
In the first GitHub download link, you have to click on download. Its a “.bin” file. To download the STM Flash loader from the above link, you have to enter your e-mail address and they will mail you the download link. Download and install that software.
Step 2: Connect the programmer to Laptop/PC and launch the software
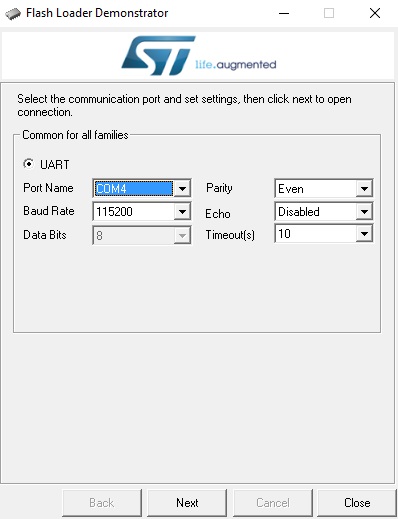
After launching the software, you will find that the software has identified the port name. This is because software consists of drivers required for Blue Pill STM32. Click Next.
Step 3: Select your device in the target list
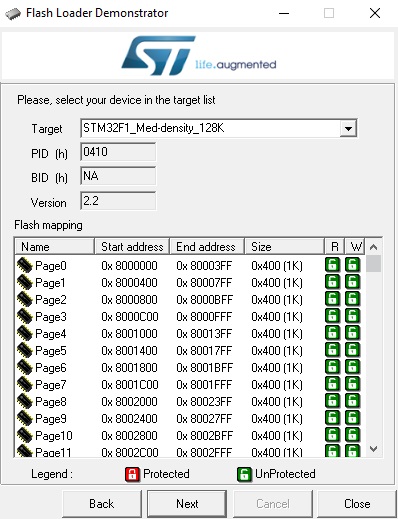
Now, you will see this window, leave all things as it is. Don’t change any settings and click next.
Step 4: Choose bootloader file
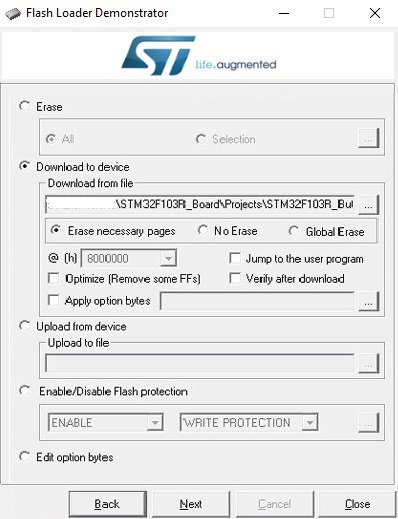
Now select “Download to Device” and choose the downloaded bootloader file. Make sure the “Erase necessary pages” option is selected. Now click on Next.
Step 5: Bootloader will be uploaded to STM 32
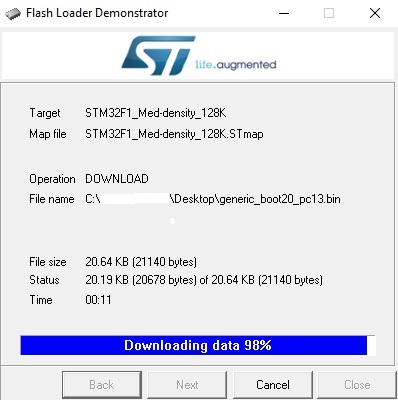
Now, the bootloader will be flashed within few seconds. Wait till 100% of data is downloaded.
Step 6: Change STM32 mode to operating mode
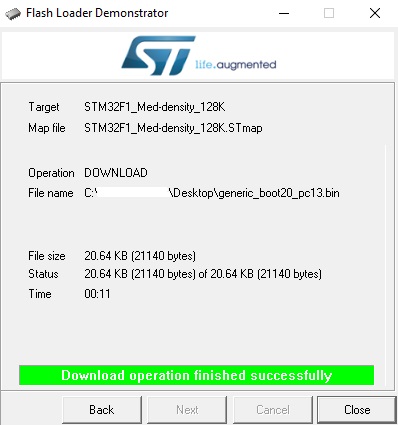
After successfully flashing bootloader, make sure you switch your STM32 again to operating mode.
Installing Blue Pill STM32 board in Arduino IDE
Now, to program STM32F103C8 with Arduino IDE, first, we have to install the STM32 board in Arduino IDE. Steps for the same are as below:
Step 1: Install Arduino IDE
If you don’t have Arduino IDE, you can download and install it from this link.
Step 2: Add board preferences
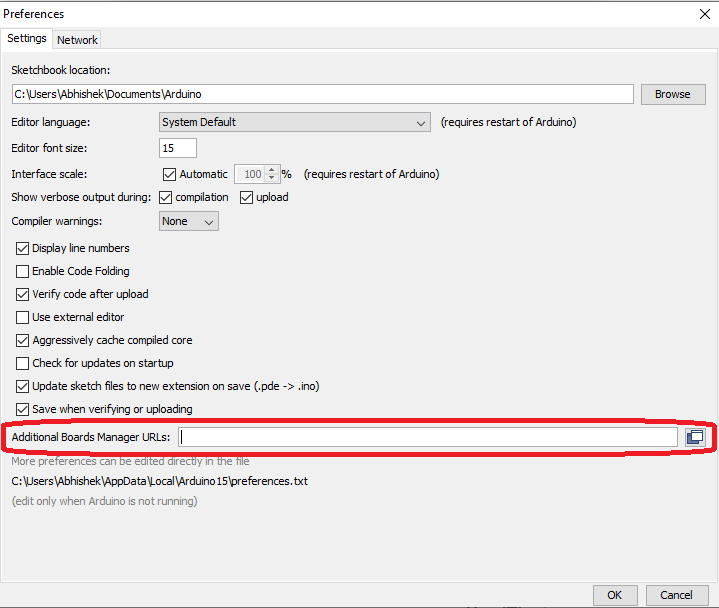
You need to add board preferences in Arduino IDE. To add this, click on File > Preferences. After this, the following window will open. Here, add the link below in the “Additional Boards Manager URLs” list
http://dan.drown.org/stm32duino/package_STM32duino_index.json
Step 3: Open Boards Manager
Now open Arduino Boards manager and search for “STM32”. You can find Boards Manager by the following image below:
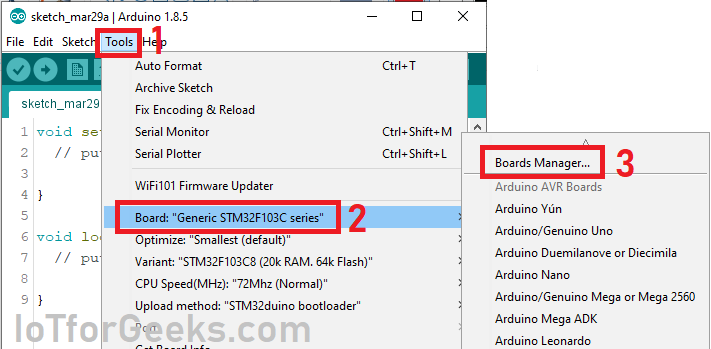
Here, ignore the board name mentioned at step 2 in the above image. Its showing STM32F103C because I have already installed board, in your case, it may be different.
Step 4: Search for STM32
In Arduino boards manager, search for “STM32” and install STM32 board as shown in the image below:
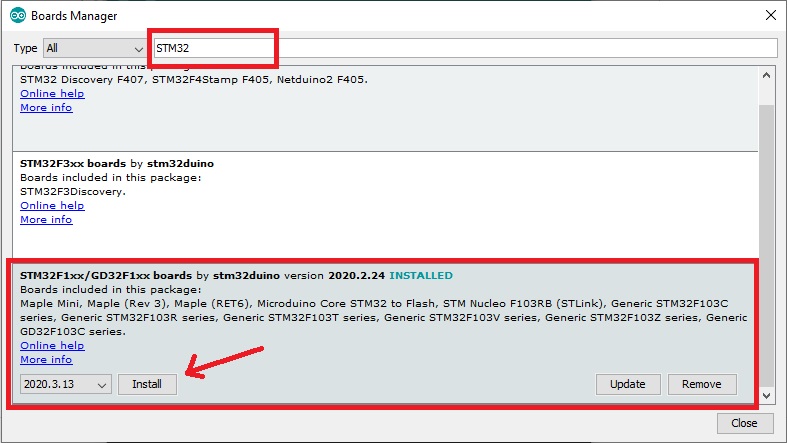
Board will be installed once you click on install. After successful installation, restart Arduino IDE.
Step 5: Install Necessary Drivers
Now, you have to install the necessary drivers to interface your STM32 development board with Arduino IDE. To install drivers, navigate to C:\Program Files (x86)\Arduino\hardware\Arduino_STM32-master\drivers\win where you will find install_drivers.bat and install_STM_COM_drivers.bat
After this step, your Arduino IDE is prepared to Program STM32 Blue Pill development board.
Program Blue Pill STM32 directly with USB port
Now, After connecting STM32 with PC/Laptop, it will be recognized by your PC/Laptop. You can find it in Tools > Boards. You STM32F103C is now ready to be programmed!
Open sample sketch from Arduino IDE, and upload it in Blue Pill STM32. You can find a sample sketch by the method below:
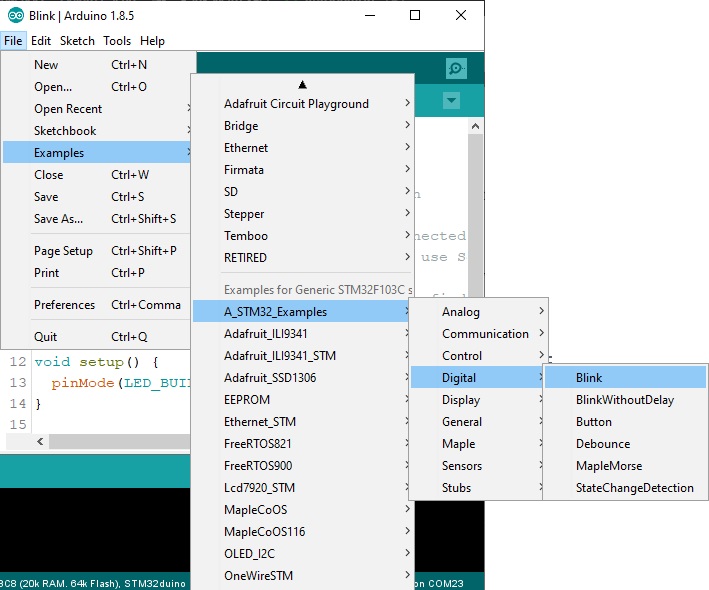
Here, you will find the code for the blinking onboard LED. This LED is connected to pin PC13. You can also upload the code below for the same:
void setup() {
  pinMode(PB1, OUTPUT);
}

void loop() {
  digitalWrite(PC13, HIGH);   // turn the LED on (HIGH is the voltage level)
  delay(1000);              // wait for a second
  digitalWrite(PC13, LOW);    // turn the LED off by making the voltage LOW
  delay(1000);              // wait for a second
}
If the code is uploaded successfully, you will see the “Done upload” message.
After successful upload, the onboard LED will turn ON for one second and turn OFF for one second. This was just an example of a Blink LED. From now onwards, you can upload a sketch in Blue Pill STM32 as you upload in Arduino. As mentioned before, this bootloader is experimental and not advised to use in critical applications.
Hope you find this article useful to Program Blue Pill STM32 directly from USB port through Arduino IDE.
I must say, it’s a well written technical article. The information about blue pill STM32 isn’t available on the digital platform in such detailed manner. Thank you !
Happy to know that it helped you..😊
Was facing a problem with the programming, but stepwise detailed information helped a lot. Thank you!
Happy to know that it helped you..😊
what’s the difference USB STM32duino-bootloader
(https://github.com/rogerclarkmelbourne/STM32duino-bootloader)
with USB STM32_HID_Bootloader
(https://github.com/Serasidis/STM32_HID_Bootloader/releases/tag/2.2.2)?
I saw on YouTube- youtu[dot]be/Myon8H111PQ
as I know STM32_HID_Bootloader the file size is small, approximately 2KB
I was facing some error while programming the blue pill. This article was really very informative and the proper step wise step guided me to properly install the drivers and program the blue pill.. Thank you
Glad to know that, this helped you for troubleshoot!
is there an alternate pin location for the “micro usb” on the IO side of the bluepills ?
i need to use my stm32 as joystick and want to solder my usb cable directly on a “alternate pin” like others generic IO on the board instead of using the micro usb connector who is to weak and dont want to use a FTDI adapter to do that.. thanks
Hi Yohan,
If you can perform precise soldering, then you can directly solder it near the USB port. It will be an easy solution.
hellow ..
follow all steps but no respond in led