

The fingerprint scanner is one of the essential components in the security system. By adding a fingerprint scanner in your project, can elevate the project to the next level. Previously, a very less amount of modules were available for capturing the fingerprint. Nowadays, different modules of fingerprint scanners are available. In this tutorial, I will explain you to the interface Fingerprint scanner GT511C3 with NodeMCU.
Fingerprint Scanner (GT511C3)
GT511CX is the Fingerprint scanner module from SparkFun. This is not the single module but the family we can say. If you are unaware of this family, then let’s check out for the same in short.
GT511CX is a retired fingerprint scanner module family. In this family, there are two fingerprint scanner module. The first one is GT511C1R. In this, we can store 20 fingerprints. The second one is GT511C3. In this module, we can store 200 fingerprints. You can find more details about these scanners here.
In this tutorial, we are interfacing GT511C3 with the NodeMCU. The same will apply to others as well.
Interface fingerprint scanner with NodeMCU
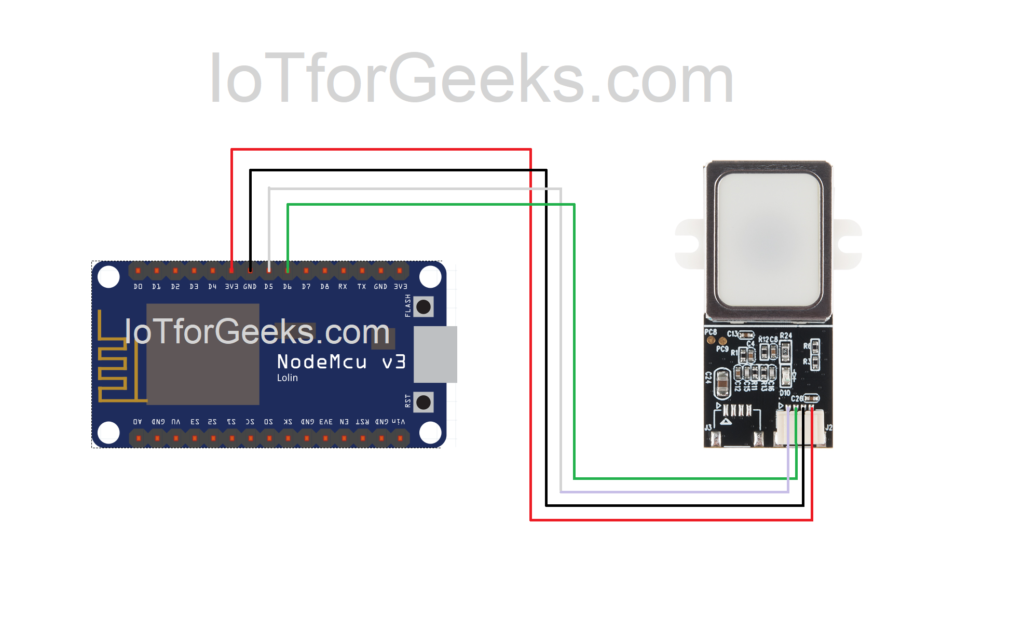
You might know that the GT511C3 library is based on software serial. Software serial will not work on all the pins of NodeMCU. NodeMCU is capable of transmitting data at a baud rate of 115200. But it can not receive data with that much of baud rate from all the pins. So, after digging more, I found that we can use Pins D5 and D6 can be used for software serial. Let’s know the connections.
| GT511C3 Pin | NodeMCU Pin |
|---|---|
| TX | D5 |
| RX | D6 |
| VCC | 3V |
| GND | G |
Following image shows the interfacing of fingerprint scanner GT511C3 with NodeMCU:
Program to Interface GT511C3 with NodeMCU
Before going for the program, we need libraries for GT511C3. Download library files for fingerprint scanner GT511C3 from link given below:
Following is the basic program to check interfacing of GT511C3 with the NodeMCU.
Blink fingerprint Scanner
#include "FPS_GT511C3.h"
#include "SoftwareSerial.h"

//For more details of hardware connections, visit https://iotforgeeks.com/interfacing-fingerprint-scanner-gt511c3-with-nodemcu

FPS_GT511C3 fps(D5, D6);

void setup()
{
	Serial.begin(9600);
	fps.UseSerialDebug = true; // so you can see the messages in the serial debug screen
	fps.Open();
}

void loop()
{
	// FPS Blink LED Test
	fps.SetLED(true);
	delay(1000);
	fps.SetLED(false);
	delay(1000);
}
Enroll Fingerprint
#include "FPS_GT511C3.h"
#include "SoftwareSerial.h"

//For more details of hardware connections, visit https://iotforgeeks.com/interfacing-fingerprint-scanner-gt511c3-with-nodemcu

FPS_GT511C3 fps(D5, D6);
void setup()
{
	Serial.begin(9600);
	delay(100);
	fps.Open();
	fps.SetLED(true);

	Enroll();
}

void Enroll()
{
	// Enroll test

	// find open enroll id
	int enrollid = 0;
	bool okid = false;
	while (okid == false)
	{
		okid = fps.CheckEnrolled(enrollid);
		if (okid==false) enrollid++;
	}
	fps.EnrollStart(enrollid);

	// enroll
	Serial.print("Press finger to Enroll #");
	Serial.println(enrollid);
	while(fps.IsPressFinger() == false) delay(100);
	bool bret = fps.CaptureFinger(true);
	int iret = 0;
	if (bret != false)
	{
		Serial.println("Remove finger");
		fps.Enroll1();
		while(fps.IsPressFinger() == true) delay(100);
		Serial.println("Press same finger again");
		while(fps.IsPressFinger() == false) delay(100);
		bret = fps.CaptureFinger(true);
		if (bret != false)
		{
			Serial.println("Remove finger");
			fps.Enroll2();
			while(fps.IsPressFinger() == true) delay(100);
			Serial.println("Press same finger yet again");
			while(fps.IsPressFinger() == false) delay(100);
			bret = fps.CaptureFinger(true);
			if (bret != false)
			{
				Serial.println("Remove finger");
				iret = fps.Enroll3();
				if (iret == 0)
				{
					Serial.println("Enrolling Successfull");
				}
				else
				{
					Serial.print("Enrolling Failed with error code:");
					Serial.println(iret);
				}
			}
			else Serial.println("Failed to capture third finger");
		}
		else Serial.println("Failed to capture second finger");
	}
	else Serial.println("Failed to capture first finger");
}


void loop()
{
	delay(100000);
}
Verify Enrolled Fingerprint
#include "FPS_GT511C3.h"
#include "SoftwareSerial.h"

//For more details of hardware connections, visit https://iotforgeeks.com/interfacing-fingerprint-scanner-gt511c3-with-nodemcu

FPS_GT511C3 fps(D5, D6);

void setup()
{
	Serial.begin(9600);
	delay(100);
	fps.Open();
	fps.SetLED(true);
}

void loop()
{

	// Identify fingerprint test
	if (fps.IsPressFinger())
	{
		fps.CaptureFinger(false);
		int id = fps.Identify1_N();
		if (id <200)
		{
			Serial.print("Verified ID:");
			Serial.println(id);
		}
		else
		{
			Serial.println("Finger not found");
		}
	}
	else
	{
		Serial.println("Please press finger");
	}
	delay(100);
}
NOTE: In order to use above codes with Serial Monitor, you must set baud rate of Serial Monitor to 9600.
Hope this tutorial helps you. You can comment your queries. Also, some troubleshooting guides are available here.
Thank you