
As we know, the Intel® Galileo gen 2 development board operates on Linux OS and also can run Arduino codes on it. It has nearly the same pinout for the Arduino section, as compared to Arduino UNO. To implement IoT applications for projects, there are many popular sites like ThingSpeak, Ubidots, Blynk, etc. Among these, We prefer Blynk for DIY projects and fast development. The main advantage of Blynk is its easy implementation and ready App. In this tutorial, we will learn to integrate Intel® Galileo gen 2 with Blynk. We will require An internet connection to do so. We will interface ESP8266-01 with Intel® Galileo gen 2 for internet connectivity to connect with Blynk servers.
Pre-requisites
- Install Intel® Galileo gen 2 development board in your Arduino IDE if not already, you need to install the Intel® Galileo gen 2 development board.
- Install Blynk libraries on your Arduino IDE. If not, you can install it.
- Install the Blynk Android/iOS app on your smartphone. Create a project and grab a project token.
Pin Connections to interface ESP8266 with Intel® Galileo Gen2
Connect the pins of ESP8266-01 to Intel® Galileo Gen2 referring to the table below:
| Intel® Galileo Gen2 Pins | ESP8266-01 Pin |
| Rx (Pin 0) | Tx |
| Tx (Pin 1) | Rx |
| Vcc (3.3 v) | Vcc |
| Vcc (3.3 v) | CH_PD |
| GND | GND |
You can also refer to the image below for clarity in Pin connections:
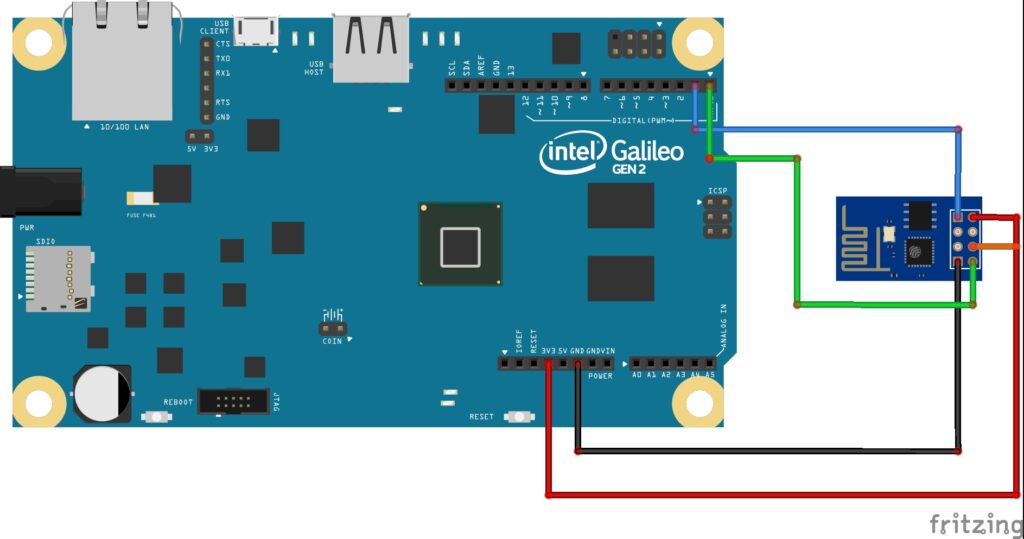
Make sure you are connecting the VCC of ESP8266 with a 3.3 v pin only. Exceeding that voltage may fry your little ESP module. Also, put CH_PD on HIGH by simply connecting it with a 3.3V pin. Connect transmitter pin of ESP with the receiver of Intel Galileo Gen 2 board and vice versa.
After a successful connection, get ready to upload the demo LED blinking code.
Upload a sample code on the development board
Let’s test the program with a sample code. Upload the below code to test the setup. Make sure you replace the fields of SSID, Password, and Token with your own.
#define BLYNK_PRINT Serial
#include <ESP8266_Lib.h>
#include <BlynkSimpleShieldEsp8266.h>

// You should get Auth Token in the Blynk App.
// Go to the Project Settings (nut icon).
char auth[] = "YOUR_TOKEN";

// Your WiFi credentials.
// Set password to "" for open networks.
char ssid[] = "SSID";
char pass[] = "PASSWORD";

// Hardware Serial on Mega, Leonardo, Micro...
#define EspSerial Serial1

// Your ESP8266 baud rate:
#define ESP8266_BAUD 115200

ESP8266 wifi(&EspSerial);

void setup()
{
  // Debug console
  Serial.begin(115200);

  // Set ESP8266 baud rate
  EspSerial.begin(ESP8266_BAUD);
  delay(10);

  Blynk.begin(auth, wifi, ssid, pass);
  // You can also specify server:
  //Blynk.begin(auth, wifi, ssid, pass, "blynk-cloud.com", 80);
  //Blynk.begin(auth, wifi, ssid, pass, IPAddress(192,168,1,100), 8080);
}

void loop()
{
  Blynk.run();
  // You can inject your own code or combine it with other sketches.
  // Check other examples on how to communicate with Blynk. Remember
  // to avoid delay() function!
}
NOTE: Program memory of Intel® Galileo gen 2 board is not persistent. Your code will be deleted upon restart and you need to upload it again!
After successful completion of the above steps, Make sure your wifi is ON so that, ESP will connect to it. Now open the Blynk app on your smartphone. After a few seconds, you will see your project is online!
Still facing issues?
- Verify that, you are satisfying the pre-requisites.
- Make sure your ESP is working!
- Re-check the project token is the same.
- Remember that, you have to replace your credentials of WiFi.
A great and well organized tutorial, really appreciate it, thank you